
Match the casing, buttons, blade and internal parts before replacing a worn remote key.
- A key shell is the outer casing, so replacing it is different from replacing the remote electronics, transponder or complete key.
- Three buttons help identify a remote, but their symbols, spacing and physical layout must also match the original key.
- The shell’s shape, hinge or folding mechanism, screw points and internal cavity can matter as much as the vehicle badge.
- A replacement shell may require transferring the original circuit board, battery, transponder and key blade, depending on its design.
- Key-blade style and whether a blade is included should be checked separately because a matching casing does not guarantee a usable blade.
- Exact compatibility should be confirmed against the original remote and vehicle details rather than inferred from the SEAT name alone.
A worn Seat remote does not always need a new key. In many cases, the damaged part is only the outer casing, while the original circuit board, transponder and key blade can be transferred to a matching replacement shell. A Seat three-button remote key shell is therefore a housing, not a complete programmed key. It will not automatically replace the electronic components or make an unmatched blade work in the vehicle.
The important first step is to confirm compatibility before ordering. Three buttons alone are not enough: the casing shape, button layout, blade style and space for the existing internal parts must correspond to the original key. Vehicle details may also matter, particularly when the replacement involves electronics rather than just the outer housing.
This guide explains how to compare the old remote with a replacement shell, which parts should remain with the original key, and when a shell-only purchase is unsuitable. It also clarifies the difference between moving components into a new casing and obtaining a complete replacement key that may require cutting or programming. That distinction is useful for Seat owners in Lithuania and elsewhere who want to avoid buying a casing that looks right but cannot accept their parts.
What a Three-Button Key Shell Actually Replaces
A three-button Seat key shell is the outer casing of the remote key: the front and rear covers, button surfaces, and the spaces that hold the original parts in place. It is not, by itself, a working remote or a programmed vehicle key. The shell protects the electronics and gives the key its original form, but it does not generate a signal or identify the key to the immobiliser.
A shell replacement can preserve the parts already fitted to your key. Depending on the design, these may include the remote circuit board, battery holder, transponder, and the existing mechanical key assembly. This is why replacing a damaged Seat remote key casing can be practical when the electronics still work and only the housing is cracked, worn, or missing its buttons. The replacement Seat key shell must still accept those original parts securely; an attractive exterior match is not enough.
Product contents vary, so read the listing carefully before ordering. A Seat key fob shell may be sold as an empty casing, while another package may include rubber buttons, a blank blade, or additional small parts. Do not assume that a photograph shows everything included. If the description does not clearly state whether it is a shell only or includes other components, ask the seller to confirm before purchase.
A complete key may be necessary when the original remote electronics are lost, severely damaged, or no longer usable, or when the immobiliser component cannot be transferred. A complete key normally involves separate cutting and programming requirements; a casing alone does not provide these functions.
The SEAT badge is therefore only a starting point. Different remote designs can carry the same badge while using different casings or internal layouts. Check the exact product contents and confirm car key shell compatibility against your original key and vehicle information rather than relying on the brand emblem alone.
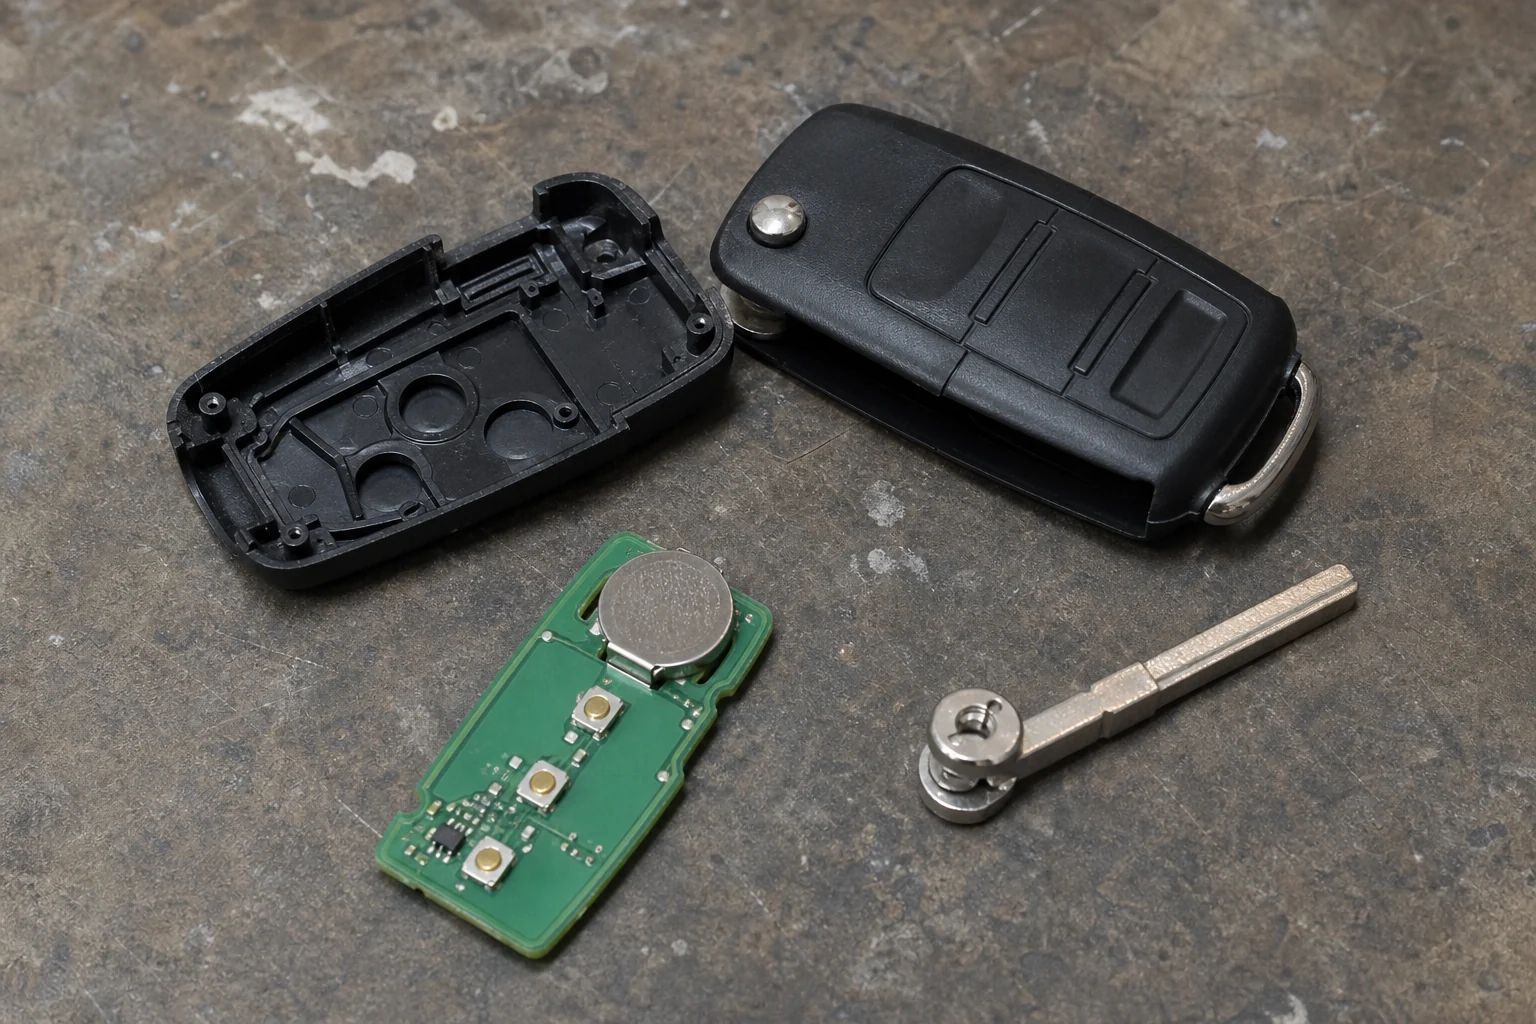
- A shell is the outer casing
- The original electronics may need to be transferred
- A complete key can involve a blade, transponder and programming
- Product contents must be confirmed before ordering
Identify the Original Three-Button Remote First
Before comparing a Seat key shell, record the exact appearance of the remote you already have. Three buttons establish only the basic format; they do not prove that every three-button Seat key case will match. Start with the button symbols, such as lock, unlock or boot release, and write down their order from top to bottom or left to right. A different symbol sequence can indicate a different remote variant, even when the casing has the same general outline.
Look closely at the buttons themselves. Note whether they are equal in size, whether one is noticeably larger, and how much space separates them. Check their orientation too: some remotes use a vertical row, while others place the buttons at an angle or in a different section of the face. Compare the shape of the button recesses, not just the printed symbols. A listing that says “three-button” may still represent a layout that does not match your original.
Take clear photographs before searching for a replacement Seat key shell. Photograph the front straight on so the button order and spacing are easy to see. Add side and rear views to show the casing’s outline, thickness and visible joins. If the remote folds, photograph it both closed and open; if it does not, show it in its normal fixed position. Use good light and keep the camera level. Blurred or angled images can make two different casings appear identical.
Record whether the key is folding or non-folding. On a folding remote, note where the key section sits when closed and which side contains the release or pivot area, without assuming that a similar-looking mechanism is interchangeable. On a non-folding remote, record the fixed shape and the direction in which the key extends. This distinction helps filter out listings for the wrong remote format before you compare other details.
Use the vehicle as supporting evidence, not as the only identification method. Write down the SEAT model, approximate production year and body style, then compare those details with the remote’s visible design. The same model name may have more than one remote version across different years or equipment levels, while a replacement Seat key shell listing may cover only selected variants. Your existing remote remains the primary reference.
Finally, compare your photographs with every product image, checking the symbols, order, spacing, button proportions and folding format. Do not rely on a title such as “three-button Seat remote key casing” if the photographs are unclear or show a different layout. Confirm which Seat remote variants the product represents, and ask the seller to verify the match using your photos and vehicle details before ordering when any visible feature differs.
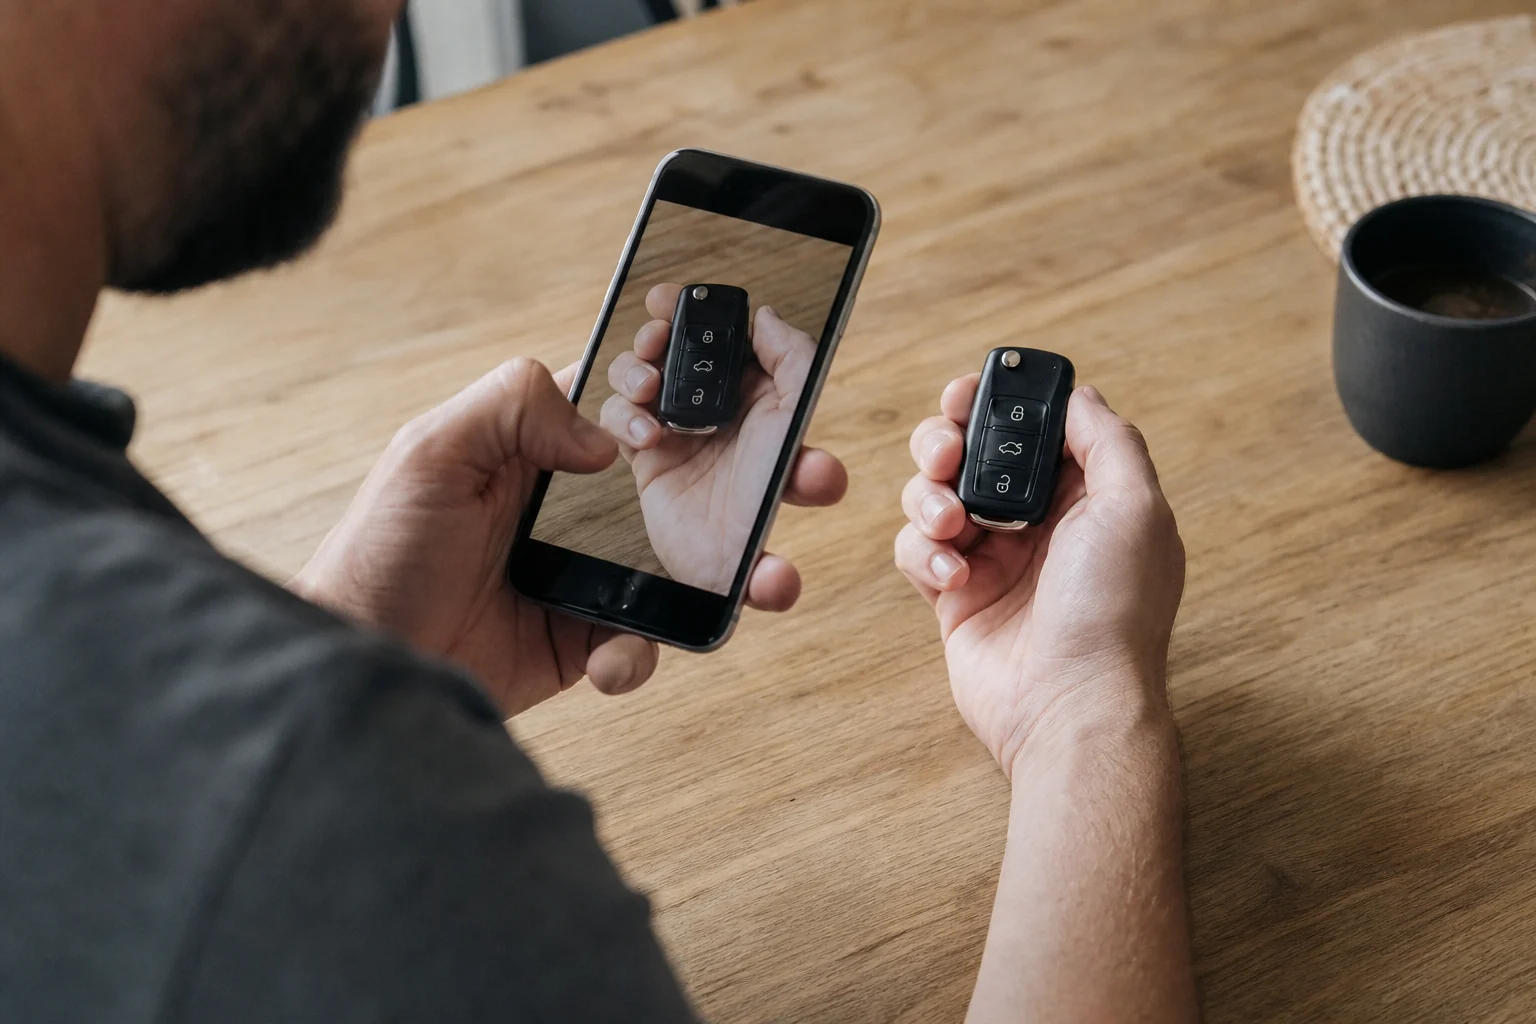
- Check button symbols and their positions
- Compare the casing profile and folding mechanism
- Confirm the internal cavity and blade arrangement
Compare the Shell’s Shape and Internal Structure
A Seat key shell can look correct in a product photo and still fail during assembly. Compare the overall profile, dimensions and edge shape with your original casing, not just the badge or general outline. Check the length and width, the thickness of the two halves, the rounded corners, and any raised or recessed sections around the buttons. A small difference in height can prevent the covers from closing or leave the original parts under pressure.
Check the folding mechanism and closure
For a folding remote, inspect the hinge end closely. The pivot area must have the same width, pin position and surrounding support as the original. Some shells use a separate hinge pin or spring, while others rely on small components transferred from the old casing. If the pivot opening is too narrow, too wide or positioned differently, the key may not fold correctly even when the main body appears identical.
Also compare how the shell closes. Look for the number and position of screw holes, the type of screw used, and whether the casing is held together by screws, clips or both. A replacement Seat key shell with different screw posts may not accept the original screws, and missing clips can leave a gap between the covers. Before ordering, check the product photographs and specifications for the closure design. Confirm whether screws, hinge parts, pins or other small fittings are included rather than assuming they come with the casing.
Inspect the internal cavity and supports
Open your existing casing carefully and compare its internal layout with the replacement images. The cavity should provide enough room for the original components without forcing them into position. Pay attention to moulded ribs, locating walls, retaining clips and small posts that prevent movement. If one support is missing or in the wrong place, a part may shift when the buttons are pressed, or the covers may not meet evenly.
Battery compartment alignment deserves its own check. Compare the battery recess, retaining edge and contact clearance with the original shell. The compartment must hold the battery in the same position and leave the cover able to close fully. A recess that is slightly offset, shallower or shaped differently can cause pressure on the battery or prevent the casing from seating correctly.
Use clear photographs of both casings from the outside and, where available, the inside. Images showing only the front face are insufficient for judging car key shell compatibility. Ask the seller or key specialist to confirm the internal construction when the hinge, screw pattern, clips or battery recess cannot be seen. Treat an unverified visual resemblance as a reason to pause, not as proof that the replacement Seat key shell will accept your original parts.
Check the Blade and Electronics Separately
A matching outer casing does not guarantee that the parts inside can be transferred. Before ordering a Seat three-button remote key shell, identify which components are meant to move from your existing key and which, if any, are supplied with the replacement. The original circuit board, battery and transponder may all need to remain with the vehicle’s existing key. A shell that cannot hold these parts securely is not a suitable replacement, even if its button positions appear correct.
Confirm what happens to the electronic parts
Check the product description for clear wording about the original circuit board and battery. A compatible Seat key shell should provide the correct spaces, supports and contacts for the board and battery used in the original remote. Do not assume that a battery holder or circuit board shown in a product photograph is included; it may be visible only because the image shows an assembled example.
The transponder needs separate attention. It is the immobiliser component that allows the vehicle to recognise the key for starting, while the remote circuit operates the lock and unlock functions. These are different roles, so a replacement casing does not automatically replace either one. Depending on the key design, the transponder may be integrated with the electronics or housed separately in a dedicated position. Before dismantling the old casing, locate it and check whether the new shell has the corresponding holder or cavity.
Transfer only the parts the listing and the physical design support. A new shell may protect the original electronics without changing them, but it does not by itself make an incompatible circuit board or transponder suitable. If the board, battery compartment or transponder position differs, stop and compare the internal parts rather than forcing them into place. Pressure on the board, a loose battery or a displaced transponder can leave the key unreliable or unable to start the vehicle.
Verify the blade before ordering
Read the blade information as carefully as the casing information. The replacement may include a cut blade, a blank blade, a blade insert, or no blade at all. “Blade included” is not enough detail on its own: confirm the stated blade type and whether it is supplied separately from the shell. Do not assume that a blank blade is ready for use; its suitability depends on its profile and whether it can be cut for the vehicle.
Compare the original blade’s profile, length, shoulder and mounting point with the replacement. Folding keys require an additional check: the blade must sit in the correct folded position, use the correct pivot or retaining arrangement, and clear the casing when opened. A blade with a similar outline can still be unusable if its mount is different or it folds in the opposite position.
Parts cannot always be transferred between superficially similar Seat key designs. A three-button remote with a different blade mount may accept the original board but not the original blade, while another design may fit the blade yet leave no secure location for the transponder. Treat the blade, circuit board, battery and transponder as separate compatibility checks. If the listing does not state whether the blade is included or whether original electronics are intended for transfer, request confirmation before buying rather than relying on the vehicle model or badge alone.
Use a Compatibility Checklist Before Ordering
Use the following checks in order before buying a Seat three-button remote key shell. A three-button layout narrows the choice, but it does not confirm that the replacement casing will accept your original parts.
-
Match the buttons exactly. Compare the number, symbols, order, spacing and orientation of the buttons. For example, a boot-release symbol in a different position may indicate another remote variant, even when both casings have three buttons.
-
Compare the outer shape and fixing points. Check the casing profile, thickness, corners, folding hinge, pivot area, screw holes, clips and closure method. A similar-looking Seat key shell can still be unsuitable if the hinge does not align or the halves cannot close without pressure.
-
Inspect the internal layout. Confirm that the cavity has the same shape and supports for your original circuit board. Compare the battery position, holder orientation and clearance around the board. If the battery arrangement differs, the three-button Seat key case may not hold the original electronics securely.
-
Confirm the blade arrangement. Establish whether the replacement includes a blade, accepts your existing blade, or is supplied without one. Compare the blade profile, mounting point and folding position. Do not assume that a blade with the same visible length will fit the same hinge or lock.
-
Use vehicle details as supporting evidence. Record the Seat model, approximate year, body style and, where appropriate, registration or other identifying information. These details help narrow the possibilities, but they should support—not replace—comparison with the original remote.
If any check is uncertain, pause rather than infer compatibility from the SEAT badge, a product photograph or the phrase “three-button”. Send clear photographs of the front, rear, side, hinge and opened casing, together with the button layout and the details listed above. Ask whether the seller or key specialist can assess the shell, cavity, battery arrangement and blade profile from that information.
For customers ordering in Lithuania, use the contact or offer-request route displayed on the relevant website, if one is available. Before sending your request, confirm which details the business can review and whether it needs additional photographs or markings from the original key. This gives the reviewer enough information to identify a likely match—or to tell you that a particular replacement Seat key shell should not be ordered.
Choosing a three-button Seat key shell is mainly a matter of matching, not appearance. Before buying, compare the original casing with the replacement by button layout, shell shape, blade style, transponder or circuit-board fit, and the exact vehicle and key version. A shell that looks right may still fail to hold your electronics or accept the blade correctly. For drivers in Lithuania, keeping the damaged original key available for comparison—and checking uncertain details with a car-key specialist—can prevent an otherwise avoidable mismatch. Replace the casing only when these details align.
- Photograph the original key from several angles
- Match the three-button layout
- Compare hinge, screws and interior supports
- Check blade inclusion and profile
- Ask for confirmation if any detail differs
Choose the option that matches your vehicle and situation.
Frequently asked questions
Does a three-button Seat key shell include the remote electronics?
Normally, a key shell is only the outer casing, including the buttons or button panel and spaces for the original components. Some listings may include additional parts, but this cannot be assumed. Check whether the circuit board, transponder, battery holder and blade are included before ordering.
Can I use my original circuit board in a replacement Seat shell?
Possibly, but the board must match the new casing’s internal design. Check the supports, locating points, cavity shape, button contact arrangement and closure method. Even when two remotes have three buttons and a similar outline, their circuit boards may not sit or operate correctly in the replacement shell.
Are all three-button Seat keys interchangeable?
No. Three buttons only describe the control count; they do not confirm compatibility. Different keys may have a different button layout, casing structure, circuit-board design, transponder arrangement or blade fitting. Compare the complete original remote with the listing photos and specifications instead of relying on the button count alone.
How can I tell whether the replacement shell has the right key blade?
First check whether the listing includes a blade at all. Then compare the blade profile, its mounting or hinge style, and its folded position with your original key. A blade that looks similar in a photo may still use a different fitting, so ask the seller for confirmation if any detail is unclear.
Will replacing the casing remove the need for key programming?
Replacing an outer casing is separate from replacing or programming the remote electronics and transponder. If your original electronic components and transponder are transferred successfully, a shell change may not involve programming those parts. The physical replacement itself does not automatically program a new remote or transponder.
What photos should I take before ordering a Seat key shell?
Take clear photos of the remote’s front, back and side, then photograph it open so the internal supports and circuit board can be seen. Also include the buttons, blade, hinge or mounting area, and any identifying markings. Good lighting and close, in-focus images make comparison much more reliable.
What if the original Seat key still works but the casing is damaged?
A shell-only replacement may be the relevant option when the original remote electronics still work and only the casing is cracked, worn or missing buttons. Before ordering, confirm that the original board, transponder and blade can be transferred into the replacement shell and that the internal layout matches.
What vehicle details help confirm a Seat key shell?
The vehicle model and year can help narrow the search, but they should not be treated as proof of compatibility. Compare those details with the original remote’s button layout, casing shape, blade and internal arrangement. If the match is uncertain, provide the vehicle details together with clear photos and request confirmation before ordering.
